Tuesday, September 4, 2012

It's been a while! Rag wreath!

We've been busy over at compassionfortheorphan.blogspot.com! We are adopting a baby from Ethiopia and have been busy fund raising! So hop over to that blog and check out the really cool things you can buy from us to help support our adoption!

Here's a project I have seen various places and finally decided to try out! I needed something for fall and we don't have any extra money to buy one. So I dug through my fabric stash and found this leftover "country" fabric!
It's a Rag Wreath!
Here's what you do to make it!
  1. Fabric, about a 1/2 yard (designs are best, or multiple colors)
  2. I cut strips about 3-5 inches long and 1/8-3/4 of an inch wide, I wanted it to look shabby. If you want a more uniform fluff you'll need to trim them all to the same length. I just cut as many as I thought looked good. You can be the judge of how many strips you'll need! 
  3. A wire coat hanger formed to the shape you want. I bend the hook down into a loop too.
  4. Time and patience!


 You'll want to tie about 1/4 of them on and then disperse longer/shorter strips where needed if your strips are not all the same length.
See how jagged the edge of my fabric was? That's from having all kinds of sizes and shapes of strips.

There ya have it! Happy DIY!


Friday, May 25, 2012

Girls only!

Do you get tired of purchasing feminine products? Looking for a better way to go about the good ole Aunt Flo that doesn't hurt the environment AND your wallet? Then I have a plan for you!

Ever wonder how they kept things under control monthly before there were disposables? Well obviously they used cloth! If we use cloth diapers on our kids it makes sense to try it for us too. I went to Partypantspads.com because I was curious and my good ole mum sent me a link. It was Earth day and they had a free shipping day. So I thought why not try it out. They have a "Cloth Pad Curious" free pad you must got a hold of! These things are glorious, and FREE! If you use disposable pads you are used to the "diaper" feel but these I can hardly tell they are there.

Naturally I look to do EVERYTHING the hard way so I embarked on making my own cloth pads and they turned out SO well.

  1. You'll need a pattern. I took a disposable pad and traced it roughly with about 1/4 inch around the pad for a seam allowance. If you are more of a perfectionist you can find cloth pad patterns HERE
  2. I used an old T-shirt with several layers sewn together for my absorbency. 
  3. You'll need a waterproof fabric. I used leftover PUL fabric from making cloth diapers so my pads look like a tiny cloth diaper. You may want to purchase something a little more grown up for yours. You can also use an old rain coat.
  4. Cut out the fabric. 
  5. I sewed a small rectangle of about 6 layers of t-shirt into the top layer of absorbency so that it has more power with less bulk. 
  6. Pin the top and PUL layers together wrong sides out. 
  7. Sew! Make sure you leave room to turn out, I ALWAYS forget to do this and it is soooo frustrating!
  8. Turn the fabric out and press the seam.
  9. Sew a finishing stitch along the seam.
  10. I used velcro to secure the wings because I find snaps to be a little uncomfortable.
  11. You can wash them just like regular clothes. Everything stays fairly contained so it isn't too yucky. I try to not let them dry the whole cycle for longevity but it doesn't matter too much how you dry them. You could hang hem out on a line for all your neighbors to see too! :)
There ya go! The pictures don't show velcro because I had to find some not so stiff velcro for comfort. The t-shirt fabric is under the minky, which is super soft I might add! You know you like my monkey PUL fabric too! You could make panty liners for everyday use and save many dollars! I have contemplated making some "Flo undies" with built in velcro to attach the pad to the panty for more security but that may be too much!

All in all this project cost less than 15 dollars and has made 10 pads with leftovers to make more if I need too! 

Have you used cloth pads before? Do you like them? Have you tried making your own? Share your stories below!

Happy DIY!

~B

Wednesday, May 2, 2012

Cloth Diaper Liner Tutorial

I first attempted to make a whole cloth diaper and learned I suck at sewing elastic. So I decided I would just try and make the liners. I read online that you could make liners out of old T-shirts so I got to work. I use Kawaii Baby Cloth diapers, I love the bamboo liners they have but they are more expensive and the alternative are far too bulky. The T-liners are very slim and VERY absorbent. So I see this as a WIN! Here's the how to! Feel free to fiddle with it and make it work for you! You could make these for any style of pocket diaper really! You could add snaps if you have that style too I am sure.

Step one, find an old T-shirt! Then trace a liner from your current diapers.

Step two, cut it out. I layered the shirt twice over so I would have four layers automatically.

Line them up nicely.

I used 6 layers in a single liner.

Step four, sew two vertical passes to ensure the layers don't slide around during wear or wash.

Should look similar to this!

Step five, sew around the edge. I didn't use any special stitching. Not sure if that will make a difference in it holding up. I sewed around it twice to make sure it was sturdy though!

Good luck and happy DIY!

~B

Monday, April 23, 2012

DIY Air Freshener!


DIY Air Freshener!

You'll need: 
  1. A box of baking soda (I made six so I bought two big boxes with enough leftover for my fridge).
  2. Essential oil of some scent you love. I used tea tree and lavender but have since bought honeysuckle.
  3. Jars and rings.
  4. Paper, coffee filter, or even just the flats of the canning jar lids.
  5. Whatever decorative touch you want!


Step one: Put the desired amount of baking soda in the jar!
Step two: Put two drops or so of your essential oils. If you have a particularly stinky area you may want to add more oils.
Step three: If you are using coffee filters just center the filter on the jar and screw the ring on. I used a pin to add a few holes so it would be able to absorb more stink. If you are using paper you need to trace the flat lid and cut out. Then place that on top and screw on the ring. I used a nail to poke holes in the paper so it would be porous. If you are using the canning flat lid you'll need to hammer a nail to make holes in the lid, then use it like a lid ;).
 
Step four: Shake it whenever you want a burst of scent, other than that, play around with decorating with them.
Can be used in cars, bedrooms, bathrooms, kitchens, and my personal favorite: the dogs room!


Happy DIY! 

~B


Wednesday, March 28, 2012

Flip Flop Wreath

I got my inspiration from this: http://usasillyyaks.blogspot.com/2012/03/flip-flop-wreathperfect-for-summer.html. I tried her method on my flops and to no avail, the hot glue would not stick! SO, I got my creative juices flowing and.... Called my mom. Who suggested I try nailing or screwing the flops together. I decided that was a little too much but while we talked I had a revelation, a eureka if you will. A wire hanger would be perfect! So this is what ensued:

How to make a flip flop wreath

  1. Buy your supplies (or raid your kids closets for flip flops that don't fit and aren't all worn out). You will need:
    1. I used 4 pairs of size small flops. 
    2. Ribbon of some kind, I used a paper type.
    3. Hot glue, and lots of it.
    4. A metal hanger, I had trouble finding them in my house.
    5. About 4 or 5 twisty ties. 
  2. First I tried hot gluing them together like in the inspiration (see link at the beginning) but when that didn't work out I tried a coat hanger. I separated the ends and  formed it into a circle. It was not quite long enough to go all the way around but worked well. 
  3. I hot glued it to whatever part of flop it touched, heavily (I used 5 stick of glue total, overkill? Probably.) 
  4. The part of the wreath where it was too short I used a knife and cut holes in the flops where you couldn't see and secured with twisty ties. 
  5. After the glue had completely set I turned the wreath over and measured the ribbon so that it would hang a flip flop in the middle. 
  6. I used the hole in the flop trick with twisty ties to secure the ribbon to the flop. 
  7. I then used twisty ties to make the bow and secure it to the coat hanger loop. 
  8. Make sure all glue is set and there you have it! An awesomely cute summer wreath! I have gotten so many comments on how stinking cute this is since I made it!  
I would try to see if your hot glue will stick with your flops before going to the extent of using a hanger. Mine had trouble sticking to the soft soles, the bottoms and plastic stuck perfectly. Happy DIY!

B


Saturday, March 24, 2012

DIY Closable Dog Bed

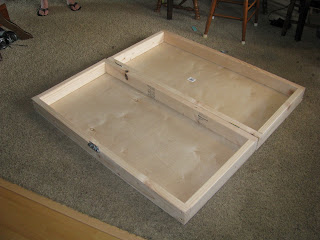
Many of you probably have a dog who destroys those comfy dog beds. We have three dogs, one of them does this destroying thing. We have been through about 7 beds for our big dog who needs to use one since we got the little destructaur (I know that's not a word). ANYWAY We came up with a dog bed that you can close and lock during the day. Still providing a dog a place to lay but no bed for them to chew!
Step by step instructions


  1. Buy the hardware and lumber. Here's what we used:
    1. Three (3) 2"x4"x8' untreated boards
    2. Two (2) 2'x4' 15/32" thick plywood boards (probably overkill)
    3. One (1) 4" barrel bolt (use any latch that you like) and included screws
    4. Two (2) 2.5" hinges and included screws
    5. A bunch of #8 2.375" self-tapping drywall screws (approximately 24)
    6.  Sandpaper (eventually)
    7. Padding (store bought dog bed)
  2. Saw down the 2x4 boards to four 4' lengths and four 21" lengths. This leaves a little chunk to use if you wish to raise the bed.
  3. Drill pilot holes on the 4' boards. You need two holes approximately 0.75" in from the end of the board on each side. These two holes should be approximately 0.75" from the other edge of the board
  4. Attach a 4' board to a 21" board as seen above.
  5. Attach a 21" board to the other end (you will have a c-shaped wood frame)
  6. Attach a second 4' board to the other end to finish off the frame. 
  7. Align the plywood with the frame and tack down the corners with the dry wall screws. 
  8. Secure it with screws in the middle of all four sides (halfway between the corner screws).
  9. Repeat steps 4-8 to make other side.
  10. Stand them up with plywood side facing out and place hinges where you want them. Make sure the hinge itself is centered so it will open and close freely.
     
  11. Flip it over (you may need someone to help you hold it for this step) and attach the latch you chose to use. For ours we used a 4" barrel bolt. We only put screws in one side of the bolt and then the other side of the latch for the barrel bolt (so the screws were on opposite sides).
     
  12. Finish it off how you like! We are going to sand the edges down a bit and soak them with bitters so they don't get chewed up too badly! 
We haven't tested this completely so try at your own risk. We'll update this when we know whether it worked for us or not. The goal is to leave it open at night when our chewer is in his crate and the non-chewer is out of a crate. We will close it when the chewer comes out of the crate! Happy DIY!

-K & B